How to write a Client (.NET)
This article explains how to create a .NET client that connects to the server we built in How to write a Remoting SDK Server (.NET) and calls one of its service methods.
Notes:
- It is recommended that you read How to write a Remoting SDK Server (.NET) first — the steps below assume that server (
MyServer, exposingService1.DoSomething) is available and running. - Equivalent articles exist for Delphi, see How to write a Remoting SDK Server (Delphi) and How to write a Remoting SDK Client (Delphi).
- There is also How to write a Remoting SDK Client (JavaScript).
A Remoting SDK client is any .NET project — there is no dedicated "client" template. You take a normal application, import the server's service definition, and call the generated proxy. This walkthrough uses a simple Console application.
Creating the client project
In Visual Studio choose File → New → Project and create a Console App (C#). This article names it MyClient and adds it to the same solution as the server, but it could be any project type (Console, WinForms, WPF, …) in its own solution.
Importing the server's service definition
For the client to call the server it needs the server's interface (proxy). Remoting SDK generates this for you from a running server:
- Make sure the server (
MyServer) is running. - With the client project selected, choose Extensions → Connect to Remoting SDK Server….
- In the dialog, enter the server's URL —
http://localhost:8099/bin— and click Connect. (You can also browse to a local.RODLfile or detect a server on the network via ZeroConf.)
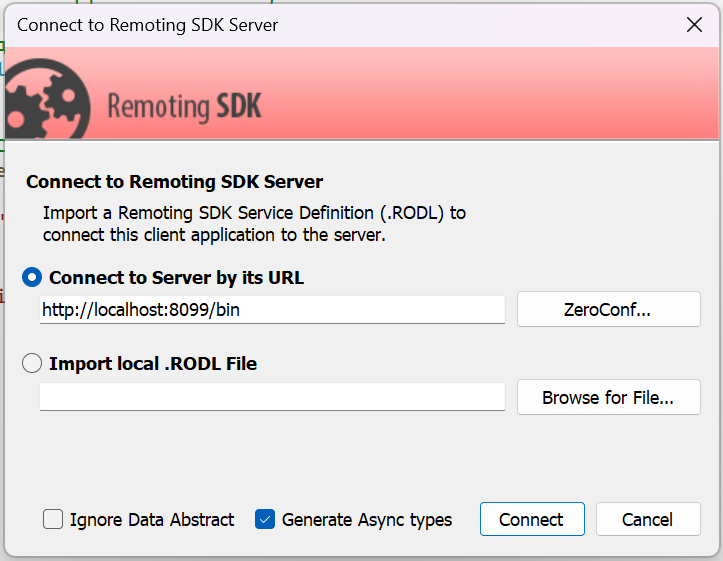
For the full walkthrough of this dialog see Connecting to a Remoting SDK Server (Visual Studio).
Remoting SDK retrieves the RODL and adds three files to your project, all named after the server:
MyServer_Intf.cs— the generated proxy: the service interfaces (e.g.IService1) andCo-classes (e.g.CoService1) you use to call the server.MyServer_ServerAccess.cs— a convenience helper that exposes each service as a property.MyServer.remoteRODL— a small file linking the project to the server URL so you can later re-generate the interface when the server changes.
Calling the service
Open the client's Program.cs and replace its contents with the following. We create a client channel and a message that match the server, build a proxy for Service1, and call DoSomething:
using RemObjects.SDK;
using MyServer;   // generated interfaces: IService1, CoService1

// A client channel pointed at the server, and a matching message
var channel = new IpHttpClientChannel { TargetUrl = "http://localhost:8099/bin" };
var message = new BinMessage();

// Build the proxy and call the remote method
IService1 service = CoService1.Create(message, channel);
string result = service.DoSomething("hello world");

Console.WriteLine($"Server returned: {result}");
Console.WriteLine("Press Enter to exit.");
Console.ReadLine();
A few things worth noting:
- The server publishes a
BinMessageon the/binpath, so the client usesBinMessageand anIpHttpClientChannelwith that URL. CoService1.Create(message, channel)returns the proxy — callingservice.DoSomething(...)looks like a local call but is dispatched to the server.- We create the channel explicitly (rather than via the auto-matching helper in
ServerAccess) so the HTTP channel type is registered in a plain console app.
Running it
- Start the server (
MyServer) with Ctrl+F5 so it keeps running. - Set the client (
MyClient) as the startup project and press F5.
The client connects, calls DoSomething("hello world"), and the server returns it upper-cased:
Server returned: HELLO WORLD
Press Enter to exit.
Conclusion
That's it — everything to do with HTTP connectivity and message encoding was handled by Remoting SDK. Calling a remote method is as simple as calling a local one: import the interface, create a channel and message, and call through the proxy.